
Understanding Audio Compression
A Detailed Explanation

In this series of articles, I am going to explain in depth the processes of several music production tools and effects, such as compression, limiting, reverb, delay, dithering and more.
I will try my best to explain in a way that is easily understood by music producers of all stages, starting with compression.
What is a compressor?
A compressor is a dynamic effect tool that will help you to get a more even sound level on the audio that you are compressing. It can be used both to raise the volume on bits of the recording that are low, or to raise the general volume of a recording in a more controlled way.
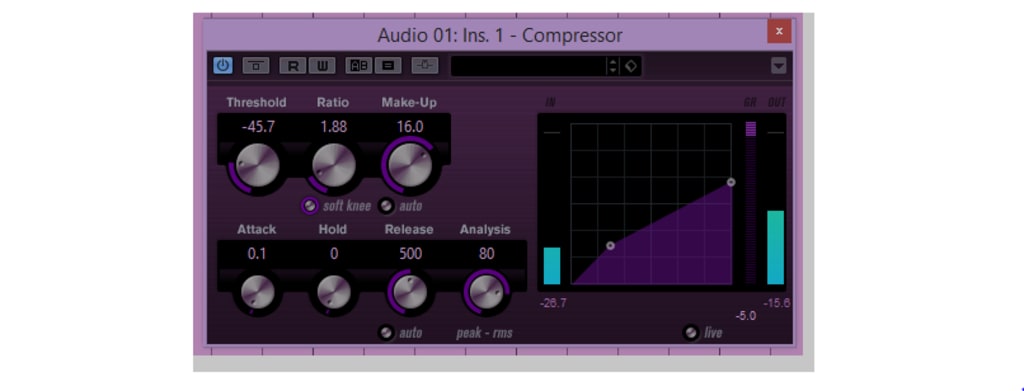
To completely understand a compressor, you need to know that there is a certain point at which the audio cannot get any louder without distorting the sound, this is 0.

Say for example that you have a recording of a flute and some parts of the piece are played very quietly, and other parts are played louder.
In the example above, the red line represents the level of the audio signal and as you can see, if you just raise the volume normally with say +5db, the louder parts of the flute recording would cross the black 0 line and cause clipping, the new and louder audio signal is represented by the orange line in the example picture below.

You wish to even out the levels and raise the volume where it’s needed without turning up the louder parts, and this is where a compressor comes in handy!
This is the compressor that comes with Steinberg’s Cubase, and the one I’ll be using to explain the process in this article.

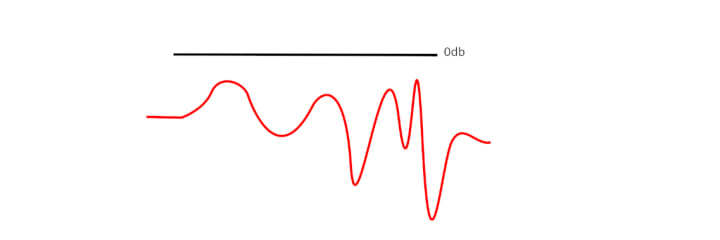
Threshold
The first step to compression is setting the threshold. The threshold is the point where you have decided the volume isn’t allowed to go any higher. The threshold is represented with a green line in the example below.
When the threshold is set, you can adjust the volume level in a more controlled way. If I now raise the level of my flute, the levels would raise evenly on all parts of the audio signal underneath the threshold, and be compressed (lowered) on all parts over the threshold, thereby achieving a more even signal.

Ratio
The ratio determines how strict the compressor should be with enforcing the threshold limit. A “soft knee” allows the compressor to still let some audio pass over the threshold for a more natural and rounded sound, and a “hard knee” will be stricter and let a lot less audio through, but now we’re touching on a different, but highly related subject, which is Limiting, but I’ll get into that in a different article.
Make-up (Gain)
The know marked “Make-up” is controlling the gain (audio signal level). This is where you turn the volume up on the signal below the threshold.

You can now raise the gain and only the parts underneath the threshold will be affected. If your loud flute parts makes your compressor reduce the signal by say -7db, try setting the make-up gain to +7db as a start and listen to the result. What you will hear is a signal that appears louder, closer and more present, even if the overall signal is the same. You compressed the peaks -7db and you raised the rest with 7db, you have now created the illusion of something sounding louder without affecting your desired output level, simply through distributing the signal levels more evenly.
Attack
Attack controls how quickly the compressor responds to your settings. A quick (low) attack will react to the audio immediately and apply compression as soon as the threshold is reached. A slow (high) attack will react slower and let a little bit of the sound through before it sets in.

When I first grasped properly how the attack works was once when I was compressing drums. My kick wasn’t coming through properly and I couldn’t raise the level any more without clipping, so I decided to compress it. As soon as I compressed the kick I felt like I lost the punch and drive of the song because the kick just wasn’t loud enough even after gaining and compressing. I raised the attack a bit and made it slower, this means that before the compressor has time to react and compress the sound, some audio manages to “sneak” past before the compression starts. This allowed for the beginning of the kick to slip through and give the initial “punch,” but then the compressor quickly set in and compressed the rest of the kick, reducing and gaining the level only where it’s needed. The result was a kick that was sounding louder and more punchy, without clipping.
Hold & Release
The hold function tells the compressor how long to hold the compression before releasing, and the release function tells the compressor how quickly it should release the audio to go back to the original level. A release that is too quick might result in an audible level increase and a release that is too slow might result in over compression since the audio signal doesn’t have enough time to go back to it’s original level before it’s told to compress again.
If you have a topic in mind that you would like explained, please get in touch and I will try to write an article about it!
About the Creator
Keep reading
More stories from The Nordic Witch and writers in Beat and other communities.
Victim or Survivor
TW: Mention of self harm and suicide attempts I'll preface this article with I have never listened to any other songs by Citizen Soldier. I had never heard of them until I found out from an Icon for Hire stream where they told fans about an "upcoming collab," being with Citizen Soldier. As soon as I saw that it was on Spotify, I listened to it over and over... And over because of the lyrics.
By Rene Peters8 days ago in Beat
A New Beginning
Tony couldn’t sit still, crossing and uncrossing his legs, trying to calm his trembling hands as Clara stood at the office window deep in thought. The airline ticket in his shirt pocket moved to the beat of his heart¬– each beat bringing back the nightmare causing memories of the words he’d spoken over ten years ago. Thanks to Clara he’d finally gained the courage to buy that ticket.
By Gerald Holmes4 days ago in Fiction


Comments
There are no comments for this story
Be the first to respond and start the conversation.