
Understanding Audio Equalization
Step by Step


In this series of articles, I am going to explain in-depth the processes of several music production tools and effects, such as compression, limiting, reverb, delay, dithering, EQ, and more.
I will try my best to explain in a way that is easily understood by music producers of all stages, in this article I will be covering equalization.
What is an equalizer?
An equalizer is a hardware or software tool that enables you to pinpoint a specific frequency and adjust the loudness. It can be used in many ways but most commonly to either repair audio and cut out unwanted frequencies or to enhance your audio and emphasize frequencies that benefit the sound.
A studio I used to work in had a very badly placed fan that generated a low steady hum, around 200Hz, so I used an equalizer to "clean up" the sound a bit and lowered the loudness some around 200Hz which helped.
Another example is raising the loudness slightly in the higher frequency range (test around 10kHz to begin with), it can open up the vocals nicely and create a more present and crisp sound.
The human frequency range (the frequencies we can hear) is around 20-20,000 Hz.
Below is the equalizer (EQ) that comes with Steinberg's Cubase, a versatile and user-friendly EQ that I'll be using to explain the process.
Band Types
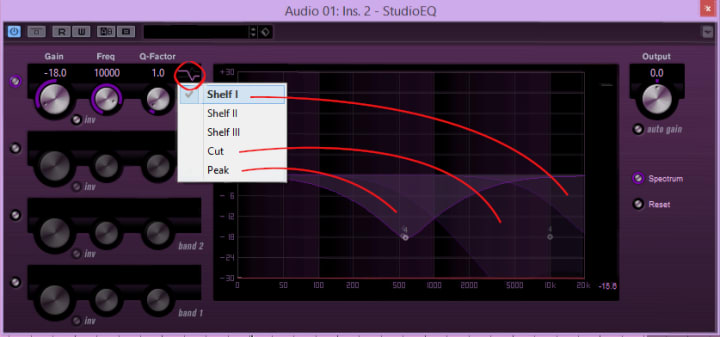
Demonstrated above are three different band types. The band type determines in what way the EQ will cut or boost different frequencies. The top one of the three band types demonstrated is called a shelf filter. It starts at a frequency that you set and affects all the frequencies before or after the starting point depending on your settings. This way you can adjust the loudness on all frequencies over or under a set point.
The middle band type is a cutting filter, also called a High-pass or Low-pass filter. The cutting curve is steeper and is used to completely remove all frequencies before or after your set starting point. Might be self-explanatory but a High-pass filter means that lower frequencies are removed, letting only the higher frequencies pass through the filter, and the other way around with a Low-pass filter.
The bottom band type is a peak filter. This kind of filter allows you to be more precise and adjust the loudness more specifically at a set point, currently set to lower frequencies around 500Hz about -10dB.
Frequency
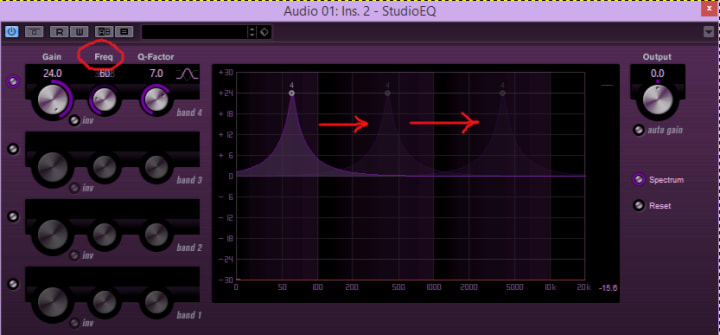
The equalizer will allow you to decide what frequencies to affect by turning, in this case, the "Freq"-wheel. In the above example, the EQ is set to dramatically raise the loudness +24db on frequencies around 60Hz. When the wheel is turned further the highlighted area of affect will move up or down the frequency spectrum depending on what way you turn the wheel.
Gain
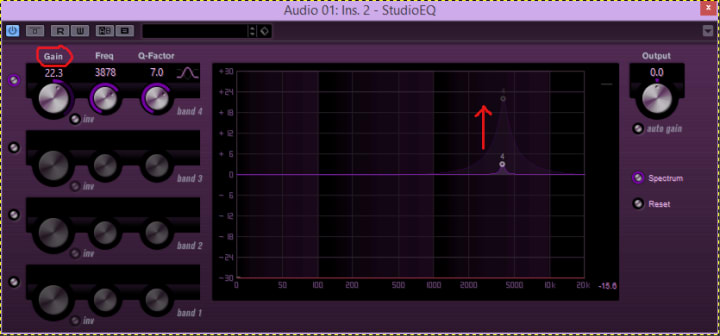
The gain wheel decides with how much to adjust the loudness. If you turn the gain up, the frequencies within your set parameters will be adjusted and the rest remains untouched.
Q-Factor
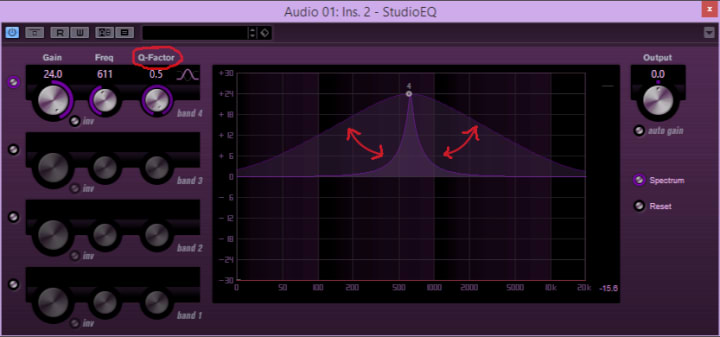
The last wheel function is called Q-factor and determines the width of the affected area. In some cases, you might need to "surgically" go in and adjust the loudness of certain frequencies, and other times you might want a wider range of frequencies affected with a more general increase or decrease of loudness. These three wheels will together help you gain control of the frequency spectrum and shape your sound with great precision.
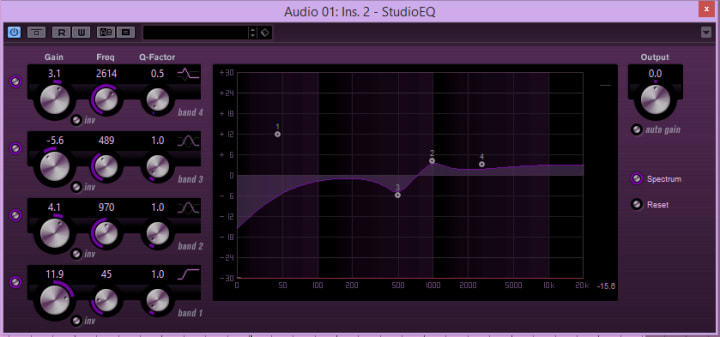
Depending on the equalizer, you have the option to make a number of adjustments to interact with each other at the same time. This EQ gives me four bands to work with. Number 1 is set to cut frequencies gradually from around 50 Hz down, number 2 is boosting 1000 Hz and number 3 is reducing 500 Hz using a peak filter, and finally, number 4 is boosting frequencies over 2500 Hz slightly using a shelf filter.
Spectrum

Some EQs have the option to see the frequency spectrum in real-time which is extremely useful in my humble opinion. Demonstrated by the grey line we can see the original audio, and the red line represents your audio after the EQ has affected it. The spectrum is also handy if you're unsure where the problem area is located. Above, you can clearly see that, for example, around 200 Hz there is a peak in activity, that might be a good place to start looking.
A great tip for exploring the frequency spectrum if searching for certain problem areas, for example, is to adjust the Q-factor up to the maximum setting, making the affected area very small, then you turn the gain up considerably so that you can hear a clear change. When this is set up, slowly drag the frequency wheel so that the affected area slowly moves across the frequency spectre exaggerating and accentuating a small part of it allowing you to hear possible problem areas or good sounding frequencies what you might want to adjust.
If there is a topic that you are interested in, please get in touch and I'll consider it for an article.
About the Creator
Keep reading
More stories from The Nordic Witch and writers in Beat and other communities.
Frankie's Song of the Week: Espresso - Sabrina Carpenter
A little something different from me while I deal with the strain of writers block. I thought I'd do a song of the week, because I have been surely annoying my neighbours and my friends with this absolute musical GEM. I am of course talking about Espresso by Sabrina Carpenter.
By Frankie Martinelli4 days ago in Beat
Taylor Swift Reveals the Meaning Behind the Song in 'Sorrowful Poets'
Following the Victims Unit's announcement, Taylor Swift used her power to release songs like 'Fortnight', 'Clara', 'Florida!!!' . On Monday, Amazon Music rolled out a streaming experience featuring Swift's reviews of her latest album. After releasing the surprise album, Swift described the 31-LP as "an anthology of new works that capture the events, thoughts, and emotions of a brief and devastating time—a time that is as poignant as it is sad. " Torture Unit became Spotify's most popular album with its message of fatalism or the song "longing, withdrawal, lost dreams", with streams exceeding 200 million in less than 24 hours.
By Mobarak Hosenabout 14 hours ago in Beat


Comments
There are no comments for this story
Be the first to respond and start the conversation.